Minimal Physics-Based Multiplayer Unity Game
Unity is a capable proprietary game development environment and arguably the most sensible choice for many independent game developers. As the first part of a learning journal, this post describes implementing a minimal multiplayer 3d game with Unity involving physics. As a disclaimer, I’m a beginner with Unity and C#, so calibrate your expectations accordingly.
Background
Since a very young age, I’ve always been fascinated by computer games and spent a significant portion of my waking hours playing them. When a friend introduced me to QBasic in elementary school, I was captivated by the possibility of making games myself. QBasic was suitable for simple text-based games, but we quickly discarded QBasic for Turbo Pascal for better performance and later migrated to DJGPP to circumvent Turbo Pascal’s memory limitations.
I sidelined game programming projects to focus on more pragmatic pursuits like studying and working. Now, after a long break, my boys are old enough that I can share my passion for computer games with them and introduce them to game development, too.
Game development tools and techniques have changed since I worked on games. Game engines like Unity offer an impressive amount of commonly applicable utilities allowing aspiring game developers to focus more on game mechanics, visuals, and content instead of tinkering with the invisible aspects of a game engine that may not help differentiate the game from other games. An integrated visual development environment allows for rapid development cycles.
However, as these engines become ever more capable and complex, studying how to use them effectively feels daunting. Writing a simple game engine from scratch using a minimal set of external dependencies for graphics, input, and audio has long felt more appealing than leveraging an existing game engine, which throws an intimidating collection of widgets at you on startup. With total control over the application, there can be an illusion of faster progress in the beginning compared to starting to learn how to use a feature-packed game engine.
Rust is perfectly suitable for game development, and a growing community of developers use it for games. I’m somewhat familiar with the language, but learning how to use it and the relevant libraries effectively in a game development context would require much effort, all of which would be away from working on the game mechanics and content.
I’ve also considered synergies with work and possibly working on web-based games using TypeScript. It has been a tempting alternative. However, assuming a renewed long-term commitment to game development, learning how to use a game engine effectively would constitute a small proportion of the overall time investment.
I thus feel I’ve now resolved this analysis paralysis and chosen to focus on the mainstream game engine, Unity. There’s still a lot to learn, but I feel the learning resources are excellent. There are abundant tutorials, documentation, and examples to study with. Language models like ChatGPT are also helpful in providing more context-specific advice. For instance, I can ask it to explain a few lines of C# code. Acquiring the same information using a search engine and documentation alone can be much more time-consuming.
Work is my primary focus, and after a full day and having taken care of family duties, I only have a little time or mental energy to dedicate to additional projects. Scoping extra projects according to time and energy constraints is crucial. I intend to structure this re-emerged game development activity into minimal proofs of concepts that help me learn a particular aspect of Unity. Minimal scoping helps focus on the essentials and makes it easier to finish them and thus gain a sense of accomplishment. I intend to consolidate my findings by keeping a learning journal in this blog.
Scope
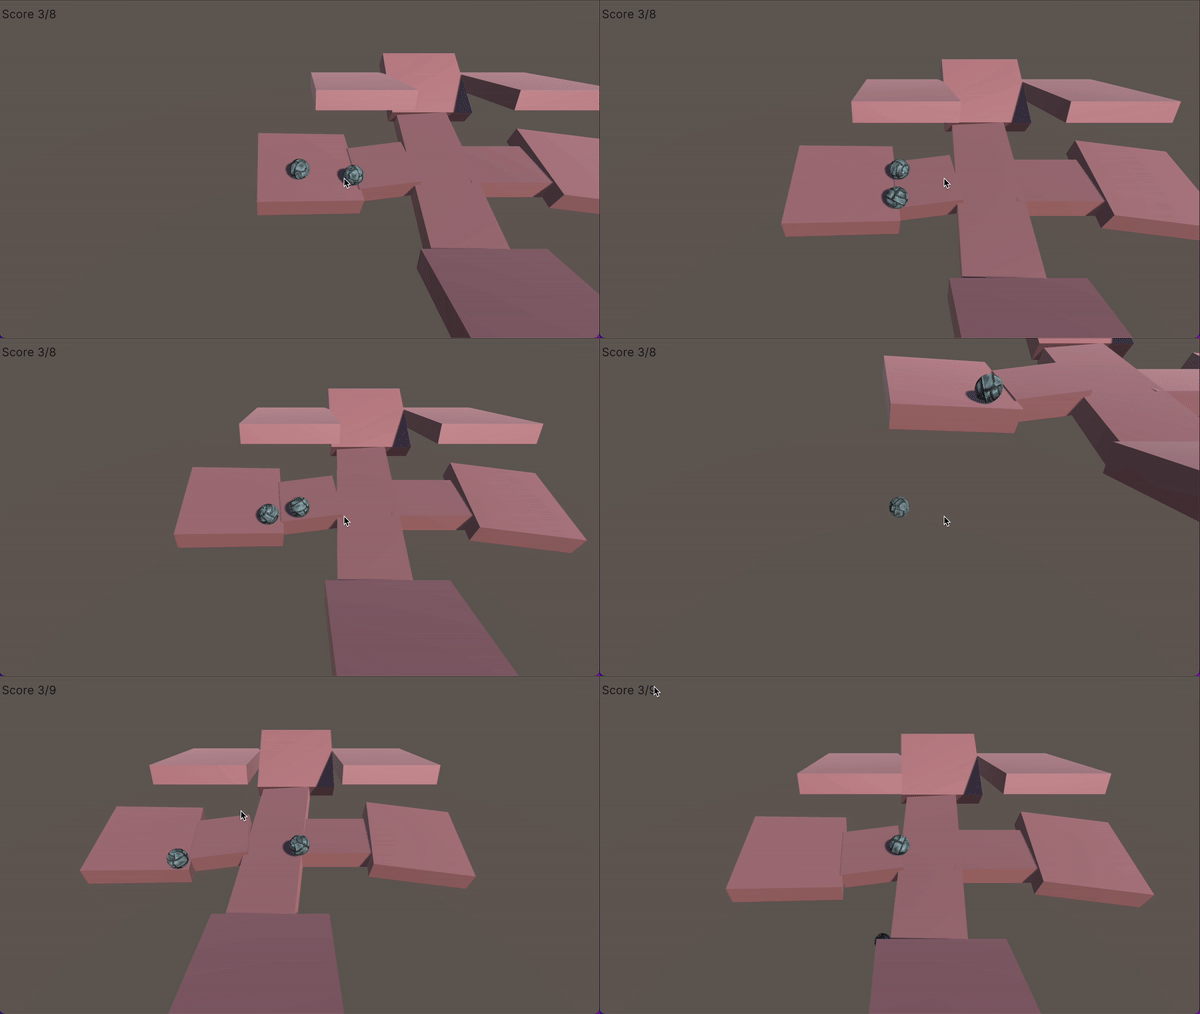
This first proof of concept aims to explore how to implement a minimal physics-based multiplayer game. In the game, each player controls a ball, which gravity affects. The scene consists of a few inclined platforms. Players should knock other players’ balls off the platforms while simultaneously trying to avoid falling. The game keeps score of how many times a player has knocked other players off into the void and how many times the player has fallen. The initial screen prompts an IP address and a port number. It then allows the user to start the game as a server or a client. The game continues indefinitely until the player closes the application.
Overview
The game leverages Netcode for GameObjects for client-server networking, state synchronization, and client-side state interpolation. The implementation borrows many code snippets from 2DSpaceShooter, which is a part of Netcode for GameObjects Bitesize Samples.
The game contains a single Scene with 16 static GameObjects. In addition to the automatically added “Main Camera” and “Directional Light,” there are nine Cubes named “Floor (n)” grouped under a wrapper GameObject “Floors,” “NetworkManager” for network connections and player spawning, “NetworkCommandLine” for starting a dedicated server, “MainMenuUI” for choosing network settings, and “InGameUI” for displaying the score.
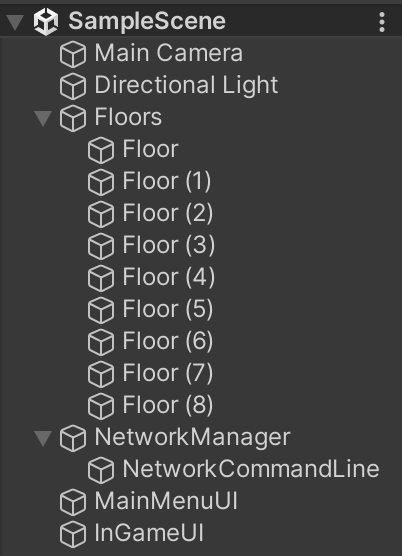
The GameObject “NetworkManager” contains two scripts “PlayerSpawner.cs” for instantiating a GameObject for a newly connected player and “NetworkManagerHud.cs” for controlling the network state using the input from “MainMenuUI”’s form.
The GameObject “NetworkManagerCommandline” contains the script “NetworkCommandline.cs”, copied from “Create a command line helper”.
The only dynamically instantiated GameObject is the “Player” Prefab, which contains a single Sphere with SphereCollider, Rigidbody, NetworkObject, NetworkTransform, NetworkRigidbody, and the script “PlayerControl.cs”.
Main Menu
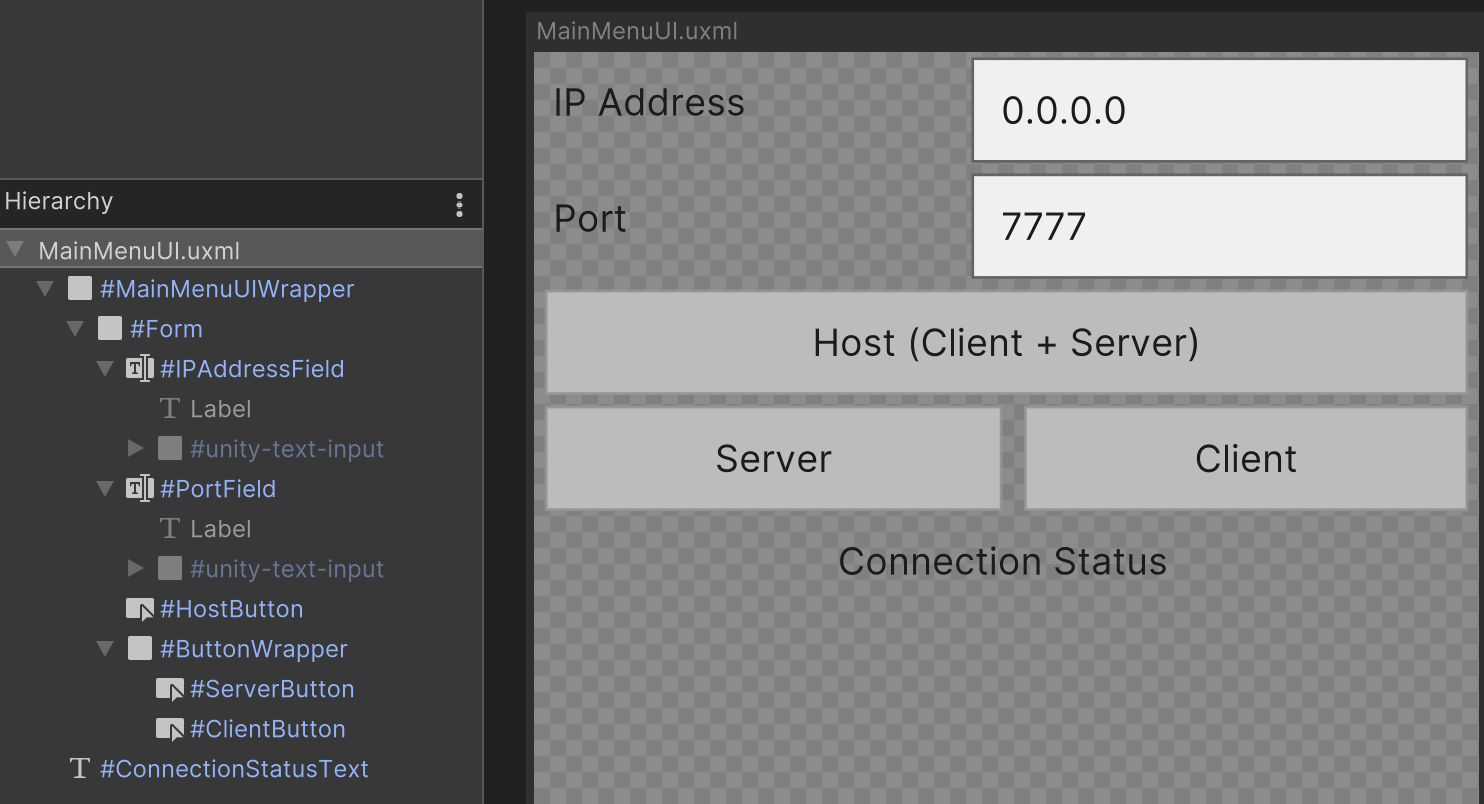
When the game starts, the script “NetworkManagerHud.cs” displays the network settings from “MainMenuUI.uxml.” The visual element tree has three wrapper elements, “MainMenuUIWrapper,” “Form,” and “ButtonWrapper,” two TextFields (one for IP address and another for port number), three Buttons for different network modes (host, server, and client), and a Label to indicate connection status.

The visual element “ButtonWrapper” sets the flex direction to "row" to lay out the server and client mode buttons on the same row.
Score Display
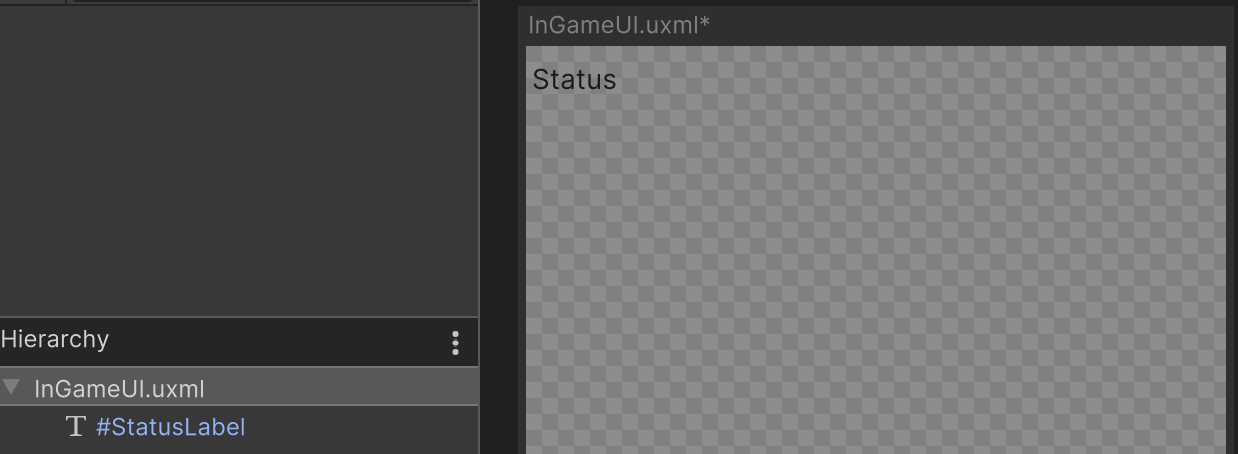
The UI document “InGameUI.uxml” referenced by the GameObject “InGameUI” is more straightforward. It contains only one visual element in its hierarchy, “StatusLabel”, of type Label.
Network Manager
The GameObject “NetworkManager” includes the NetworkManager singleton component, which controls access to Netcode for GameObject’s capabilities, like starting a server and connecting to one as a client. It instantiates a configurable player Prefab for each client after approving a connection.
The script “NetworkManagerHud.cs”, attached to the GameObject “NetworkManager,” registers click handlers to the “MainGameUI”’s buttons and controls the NetworkManager’s state accordingly.
using System.Collections;
using UnityEngine;
using Unity.Netcode;
using Unity.Netcode.Transports.UTP;
using UnityEngine.UIElements;

public class NetworkManagerHud : MonoBehaviour
{
    [SerializeField]
    UIDocument mainMenuUiDocument;

    [SerializeField]
    UIDocument inGameMenuUiDocument;

    NetworkManager networkManager;
    UnityTransport transport;
    VisualElement mainMenuRootVisualElement;
    VisualElement inGameMenuRootVisualElement;
    TextField ipAddressField;
    TextField portField;
    Button hostButton;
    Button serverButton;
    Button clientButton;
    TextElement menuStatusText;

    void ShowMainMenuUI(bool visible)
    {
        mainMenuRootVisualElement.style.display = visible ? DisplayStyle.Flex : DisplayStyle.None;
    }

    void ShowInGameMenuUI(bool visible)
    {
        inGameMenuRootVisualElement.style.display = visible
            ? DisplayStyle.Flex
            : DisplayStyle.None;
    }

    void ShowStatusText(bool visible)
    {
        menuStatusText.style.display = visible ? DisplayStyle.Flex : DisplayStyle.None;
    }

    IEnumerator ShowConnectingStatus()
    {
        menuStatusText.text = "Attempting to Connect...";
        ShowStatusText(true);

        hostButton.SetEnabled(false);
        serverButton.SetEnabled(false);
        clientButton.SetEnabled(false);

        var unityTransport = NetworkManager.Singleton.GetComponent<UnityTransport>();
        var connectTimeoutMs = unityTransport.ConnectTimeoutMS;
        var maxConnectAttempts = unityTransport.MaxConnectAttempts;

        yield return new WaitForSeconds(connectTimeoutMs * maxConnectAttempts / 1000f);

        // wait to verify connect status
        yield return new WaitForSeconds(1f);

        menuStatusText.text = "Connection Attempt Failed";
        hostButton.SetEnabled(true);
        serverButton.SetEnabled(true);
        clientButton.SetEnabled(true);

        yield return new WaitForSeconds(3f);

        ShowStatusText(false);
    }

    void OnClientConnected(ulong obj)
    {
        ShowMainMenuUI(false);
        ShowInGameMenuUI(true);
    }

    void OnClientDisconnected(ulong clientId)
    {
        if ((NetworkManager.Singleton.IsServer && clientId != NetworkManager.ServerClientId))
        {
            return;
        }
        ShowMainMenuUI(true);
        ShowInGameMenuUI(false);
    }

    void SetConnectionData()
    {
        ushort port = 7777;
        if (ushort.TryParse(portField.value, out ushort parsedPort))
        {
            port = parsedPort;
        }

        transport.SetConnectionData(ipAddressField.value, port);
    }

    void HostButtonClicked(EventBase obj)
    {
        SetConnectionData();
        NetworkManager.Singleton.StartHost();
    }

    void ClientButtonClicked(EventBase obj)
    {
        SetConnectionData();
        NetworkManager.Singleton.StartClient();
        StopAllCoroutines();
        StartCoroutine(ShowConnectingStatus());
    }

    void ServerButtonClicked(EventBase obj)
    {
        SetConnectionData();
        NetworkManager.Singleton.StartServer();
        ShowMainMenuUI(false);
    }

    void Awake()
    {
        networkManager = GetComponent<NetworkManager>();
        mainMenuRootVisualElement = mainMenuUiDocument.rootVisualElement;
        inGameMenuRootVisualElement = inGameMenuUiDocument.rootVisualElement;

        ipAddressField = mainMenuRootVisualElement.Q<TextField>("IPAddressField");
        portField = mainMenuRootVisualElement.Q<TextField>("PortField");
        hostButton = mainMenuRootVisualElement.Q<Button>("HostButton");
        clientButton = mainMenuRootVisualElement.Q<Button>("ClientButton");
        serverButton = mainMenuRootVisualElement.Q<Button>("ServerButton");
        menuStatusText = mainMenuRootVisualElement.Q<TextElement>("ConnectionStatusText");

        hostButton.clickable.clickedWithEventInfo += HostButtonClicked;
        serverButton.clickable.clickedWithEventInfo += ServerButtonClicked;
        clientButton.clickable.clickedWithEventInfo += ClientButtonClicked;
    }

    void Start()
    {
        transport = (UnityTransport)NetworkManager.Singleton.NetworkConfig.NetworkTransport;

        ShowMainMenuUI(true);
        ShowInGameMenuUI(false);

        NetworkManager.Singleton.OnClientConnectedCallback += OnClientConnected;
        NetworkManager.Singleton.OnClientDisconnectCallback += OnClientDisconnected;
    }

    void OnDestroy()
    {
        if (hostButton != null)
        {
            hostButton.clickable.clickedWithEventInfo -= HostButtonClicked;
        }

        if (serverButton != null)
        {
            serverButton.clickable.clickedWithEventInfo -= ServerButtonClicked;
        }

        if (clientButton != null)
        {
            clientButton.clickable.clickedWithEventInfo -= ClientButtonClicked;
        }

        networkManager.OnClientConnectedCallback -= OnClientConnected;
        networkManager.OnClientDisconnectCallback -= OnClientDisconnected;
    }
}
NetworkManagerHud.cs
The GameObject “NetworkManager” includes the NetworkManager singleton component, which controls access to Netcode for GameObject’s capabilities, like starting a server and connecting to one as a client. It instantiates a configurable player Prefab for each client after approving a connection.
The script “NetworkManagerHud.cs”, attached to the GameObject “NetworkManager,” registers click handlers to the “MainGameUI”’s buttons and controls the NetworkManager’s state accordingly.
While adopting the script from 2DSpaceShooter for this exercise, I learned about the SerializeField annotation. I think the primary purpose of this annotation is to make private fields editable in Unity’s inspector. Another discovery was coroutines. StartCoroutine takes an IEnumerator as a parameter and pauses the script execution as specified in the yield return expression. Here, the method “ShowConnectingStatus” uses WaitForSeconds, but there are a few other yield instructions. The var keyword was new to me and felt like something to avoid.
The Awake method looks up the form fields and buttons and registers button click handlers. Each button click handler calls “SetConnectionData,” which uses ushort.TryParse to parse the port input field’s value to an integer. The method “TryParse” uses the out keyword, which I was unfamiliar with. The call site declares a variable “parsedPort” inside the if statement’s condition, which was also interesting. The Start method shows the main menu, hides the score view, and registers callbacks for “client connected” and “client disconnected” events. It feels weird that methods to register and unregister callbacks overload the operators += and -=, but I guess that’s the C# way. If callbacks could be registered with a plain method call, using the null-conditional operator ?. here instead would simplify the code.
It was not evident to me when I read the example code from 2DSpaceShooter why the initialization code was placed in “Awake” and the rest in “Start.” The only difference between these two methods is that “Awake” is called regardless of whether the script is enabled, while “Start” is called just before calling any Update methods.
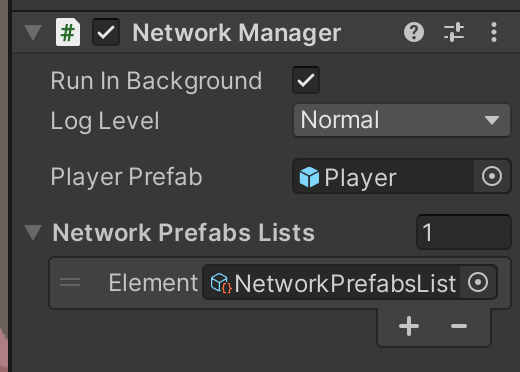
Any Prefab the NetworkManager component spawns must be included in a network Prefab list (see Object Spawning). In this game, the list contains only the Player Prefab.
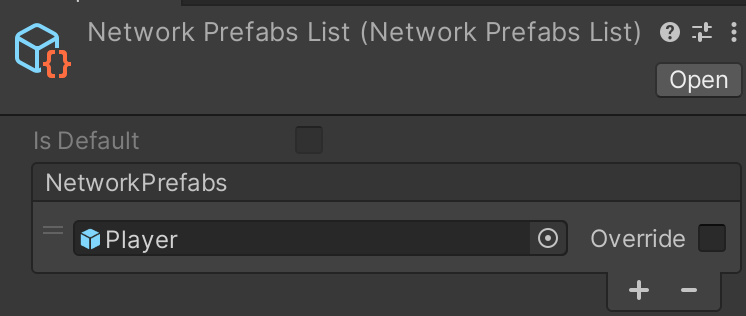
The attached script “PlayerSpawner.cs” adds a connection approval callback to the network manager. The callback function “ConnectionApprovalWithRandomSpawnPos” modifies the ConnectionApprovalResponse object given as a parameter so that the network manager always instantiates a player GameObject for the connecting client at a random position. It uses the RequireComponent annotation to ensure that the associated GameObject also has the NetworkManager component.
using Unity.Netcode;
using UnityEngine;
using Random = UnityEngine.Random;

[RequireComponent(typeof(NetworkManager))]
public class PlayerSpawner : MonoBehaviour
{
    void ConnectionApprovalWithRandomSpawnPos(
        NetworkManager.ConnectionApprovalRequest request,
        NetworkManager.ConnectionApprovalResponse response
    ) {
        response.CreatePlayerObject = true;
        response.Position = new Vector3(Random.Range(-2.5f, 2.5f), 5f, Random.Range(-2.5f, 2.5f));
        response.Rotation = Quaternion.identity;
        response.Approved = true;
    }

    private void Awake()
    {
        NetworkManager networkManager = GetComponent<NetworkManager>();
        networkManager.ConnectionApprovalCallback += ConnectionApprovalWithRandomSpawnPos;
    }

}
PlayerSpawner.cs
Controlling the Ball and Handling Collisions
The script “PlayerControl.cs” attached to the Prefab “Player” has a few responsibilities:
- sending horizontal and vertical input (e.g., keyboard arrows) to the server from the client,
- applying a force to the ball’s RigidBody according to the client-provided input,
- moving the main camera so that it tracks the local player’s ball,
- tracking the ball the player last collided with,
- teleporting the player’s ball to a random position in case it falls,
- keeping track of the score, and
- syncing the local player’s score to the “InGameUI”’s game status text element.
using Unity.Netcode;
using Unity.Netcode.Components;
using UnityEngine;
using UnityEngine.UIElements;

public class PlayerControl : NetworkBehaviour
{
    Camera mainCamera;
    Rigidbody rigidBody;
    NetworkTransform networkTransform;
    float oldMoveHorizontal;
    float oldMoveVertical;
    TextElement gameStatusTextElement;
    Vector3 movement = new Vector3(0f, 0f, 0f);
    Vector3 cameraOffset = new Vector3(0, 10f, -10f);
    Vector3 unitScale = new Vector3(1, 1, 1);
    public float speed = 5.0f;
    NetworkVariable<int> knockouts = new NetworkVariable<int>(0);
    NetworkVariable<int> knockoutsReceived = new NetworkVariable<int>(0);
    GameObject lastPlayerInteracted;

    void UpdateStatusLabel()
    {
        gameStatusTextElement.text = "Score " + knockouts.Value + "/" + knockoutsReceived.Value;
    }

    void OnStatusChanged(int _prev, int _current)
    {
        if (IsLocalPlayer)
        {
            UpdateStatusLabel();
        }
    }

    void Awake()
    {
        mainCamera = Camera.main;
        rigidBody = GetComponent<Rigidbody>();
        networkTransform = GetComponent<NetworkTransform>();
    }

    void Start()
    {
        GameObject inGameUI = GameObject.Find("InGameUI");
        UIDocument uiDocument = inGameUI.GetComponent<UIDocument>();
        gameStatusTextElement = uiDocument.rootVisualElement.Q<TextElement>("StatusLabel");

        DontDestroyOnLoad(gameObject);
        knockouts.OnValueChanged += OnStatusChanged;
        knockoutsReceived.OnValueChanged += OnStatusChanged;
        if (IsLocalPlayer)
        {
            updateStatusLabel();
        }
    }

    void OnCollisionEnter(Collision collision)
    {
        if (collision.gameObject.CompareTag("Player"))
        {
            lastPlayerInteracted = collision.gameObject;
        }
    }

    [ServerRpc]
    public void InputServerRpc(float moveHorizontal, float moveVertical)
    {
        movement = new Vector3(moveHorizontal, 0, moveVertical);
    }

    void Update()
    {
        if (IsClient && IsLocalPlayer)
        {
            float moveHorizontal = Input.GetAxis("Horizontal");
            float moveVertical = Input.GetAxis("Vertical");

            if (oldMoveHorizontal != moveHorizontal || oldMoveVertical != moveVertical)
            {
                InputServerRpc(moveHorizontal, moveVertical);
                oldMoveHorizontal = moveHorizontal;
                oldMoveVertical = moveVertical;
            }
        }
        if (IsServer)
        {
            if (rigidBody.position.y < -10)
            {
                rigidBody.position = new Vector3(
                    UnityEngine.Random.Range(-2.5f, 2.5f),
                    5f,
                    UnityEngine.Random.Range(-2.5f, 2.5f)
                );
                rigidBody.velocity = Vector3.zero;
                rigidBody.angularVelocity = Vector3.zero;

                networkTransform.Teleport(rigidBody.position, rigidBody.rotation, unitScale);
                knockoutsReceived.Value = knockoutsReceived.Value + 1;

                if (lastPlayerInteracted != null)
                {
                    PlayerControl playerController =
                        lastPlayerInteracted.GetComponent<PlayerControl>();
                    playerController.knockouts.Value = playerController.knockouts.Value + 1;
                    lastPlayerInteracted = null;
                }
            }
        }
    }

    void LateUpdate()
    {
        if (IsLocalPlayer)
        {
            mainCamera.transform.position = transform.position + cameraOffset;
        }
    }

    void FixedUpdate()
    {
        if (IsServer)
        {
            rigidBody.AddForce(movement * speed);
        }
    }
}
PlayerControl.cs
For the Netcode for GameObjects to operate correctly, a networked Prefab needs to include a NetworkObject component, and a script using network capabilities needs to derive from NetworkBehavior. When running in the client, Update sends the horizontal and vertical input (e.g., keyword arrows, see Input.GetAxis) to the server using a ServerRPC-annotated method “InputServerRpc.” The “InputServerRpc” method caches the value of the latest client-provided input vector to the local variable “movement.” The server applies force to the RigidBody of the player’s ball in the method FixedUpdate.
The “Player” Prefab also includes a NetworkTransform component, which seems like a configuration object instructing NetworkObject to synchronize the GameObject’s transform from the server to all connected clients when the transform changes more than a configurable threshold value. Finally, the attached component NetworkRigidbody sets the Rigidbody of the GameObject into kinematic mode on clients, causing it to ignore physics. The method LateUpdate sets the position of the main camera to follow the local player’s ball.
OnCollisionEnter stores a reference to another “Player” GameObject in the local variable “lastPlayerInteracted” if it collides with one. When running in the server, Update checks if the ball has fallen from the platform and, if so, teleports the ball to a random starting location. Calling NetworkTransform.Teleport ensures clients don’t interpolate the ball’s transform. The “Player” Prefab has two NetworkVariables, a convenient way to synchronize GameObject’s variables from the server to clients and run code when their values change. When the server teleports a ball to a random starting location, it modifies one or both of the NetworkVariables “knockouts” and “knockoutsReceived,” depending on whether the fallen ball collided with another player’s ball. The Start method registers “OnStatusChanged” to both NetworkVariables’ OnValueChanged event handlers. The “OnStatusChanged” method calls “UpdateStatusLabel” when the local Player GameObject’s value changes and updates the score display.
Conclusions
Creating the minimal physics-based multiplayer game presented here did not involve writing much code. Still, it took some time for me to understand some essential basics of Unity and Netcode for GameObject. There’s a significant amount of magic happening under the hood, but after getting a grasp of how different pieces fit together, you can forget the devilish details and focus on the game mechanics.
Playing a multiplayer game over the Internet requires forwarding a port for UDP traffic in the host’s router or running a dedicated server instance on a publicly accessible server. I tested running a dedicated server on a $10/month UpCloud VM, and it worked relatively well. However, the dedicated game server application consumes all available CPU, and it’d feel wasteful to keep a CPU-hogging application continuously running. I’m thus motivated to look into Unity’s Relay to eliminate the need to run dedicated server instances to facilitate p2p connectivity.
Netcode for GameObjects provides a recipe to implement server-authoritative physics, but this approach is unsuitable for fast-paced games over high-latency connections. For improved playability, each client should run physics calculations and smoothly reconcile conflicts as they arise.